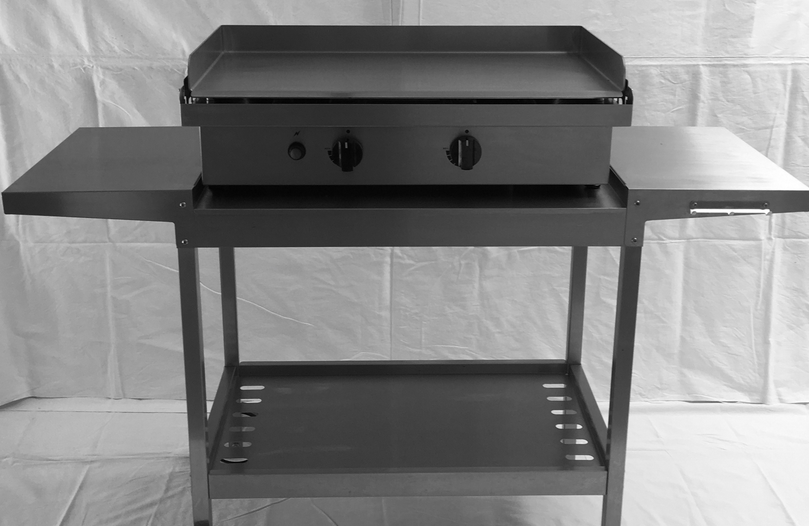
Embarking on the journey of seasoning a Blackstone Griddle is not just a task—it’s an art form that transforms your griddle into a non-stick culinary canvas, ready to bring your cooking dreams to life. Seasoning your Blackstone Griddle is the crucial first step to ensuring your meals are not only delicious but also infused with that unmistakable, authentic griddle flavor that elevates simple ingredients to culinary masterpieces. Whether you’re a seasoned chef or a home cook looking to enhance your outdoor cooking experience, mastering the technique of seasoning your Blackstone Griddle will unlock a new realm of flavor and possibilities.
In this comprehensive guide, “How To Season A Blackstone Griddle,” we delve deep into the heart of griddle seasoning, offering step-by-step instructions, expert tips, and the secrets behind creating a perfectly seasoned surface that promises effortless cooking and impeccable taste. From selecting the right oils to understanding the science behind the seasoning process, we provide all the insights you need to turn your Blackstone Griddle into the ultimate cooking tool.
But why is seasoning so important? Beyond just preventing sticking, the right seasoning technique fortifies your griddle’s surface, creating a natural, durable non-stick layer that improves with each use. This not only enhances the flavor of your food but also makes cleanup a breeze, ensuring your griddle remains in peak condition for years to come.
As you continue reading, prepare to be intrigued by the transformational power of proper seasoning, and discover how this essential process can elevate your outdoor cooking experience. Whether you’re looking to perfect your pancakes, sear steaks to perfection, or simply want to ensure your griddle stands the test of time, you’re in the right place. Let’s embark on this flavorful journey together, turning your Blackstone Griddle into the cornerstone of delicious, unforgettable meals.
Understanding Seasoning

What Does it Mean to Season a Griddle?
Seasoning a griddle means treating the cooking surface to create a natural non-stick barrier. This is done through a process called polymerization – when thin layers of oil are heated to a high temperature, they break down and bind to the metal, forming a protective coating.
The properties of this coating make it ideal for griddle cooking:
- Non-stick – Food won’t stick as readily, making cooking and cleaning much easier
- Rust-resistant – The coating seals out moisture to prevent corrosion and rust
- Smoothing – Fills in small pits and imperfections in the metal for a smooth, even cooking surface
- Flavor – Develops a patina from fats that can enhance and impart flavor
Proper seasoning is the first step to griddle greatness.
The Science Behind Seasoning: A Look at the Chemical Processes
The polymerized layers that give seasoning its non-stick properties form through a chemical process:
- Oils are heated above their smoke point, causing the fatty acid chains to break apart into smaller fragments through thermal decomposition.
- These fragmented molecules bond readily with the porous, oxidized metal surface through a process called carbonization.
- The oil remnants polymerize into a plastic-like coating, bonding with the griddle at a molecular level.
- This coating deepens over time as more layers are added through repeat oiling and heating.
Understanding this chemical transformation helps guide best practices for seasoning. High heat, thin oil layers, and repeating the process builds optimal non-stick protection.
Why Seasoning is Essential
Seasoning a griddle properly before cooking provides several key benefits:
- Non-Stick Surface – The slick polymerized oil coating prevents food from sticking and makes cleaning much easier.
- Rust Protection – Sealing the porous iron surface from moisture penetration prevents oxidation and rust.
- Even Heating – Filling in micro-pits and imperfections in the metal creates an evenly-cooked surface.
- Enhanced Flavor – Oil layers impart subtle flavor and create an ideal surface texture for forming cooking fond.
- Health Considerations – Seasoning replaces potentially toxic factory coatings with natural oil polymers.
Starting with a well-seasoned cooking surface makes all your griddling adventures more enjoyable.
Environmental and Health Considerations in Choosing Seasoning Oils
When selecting an oil for seasoning, consider:
- Smoke Point – The temperature an oil begins burning is key for polymerization.
- Sustainability – Opt for renewable plant oils like avocado and canola vs. petroleum-based.
- Processing – Minimally processed oils have higher nutritional value. Cold-pressed extra virgin oils are best.
- Taste – Lighter, neutral oils don’t impart overwhelming flavor.
- Safety – Ensure any oil is food-grade to avoid contamination.
Prioritize plant-based, cold-pressed oils for health and environmental reasons. Neutral-tasting options like grapeseed avoid overpowering food flavors.
Section 2: Preparing for Seasoning
Proper seasoning starts before you ever turn on the griddle with careful preparation of your materials, cooking surface, and environment.
Materials and Environment for Seasoning
You will need:
- High smoke point seasoning oil
- Recommended: Avocado, grapeseed, refined canola
- Clean cloths or paper towels
- Grill scrub brush and scraper
- Oven mitts or gloves – the griddle gets very hot.
- An outdoor area with good ventilation
- Seasoning can produce a lot of smoke
Choose a location that allows smoke and fumes to dissipate safely. Cover nearby plants or furniture to prevent overspray.
Inspecting and Preparing Your Griddle
See more : How Much Does A Chicken Breast Weigh? The Ultimate Guide
Before initial seasoning, inspect your griddle and ensure:
- The cooking surface is free of adhesive, oil, or residue from manufacturing and transit
- No significant damage or unevenness – seasoning won’t fix major dents or warping
- It is well supported and level – this allows oil to spread evenly during seasoning
Use a grill brush and metal scraper to remove any debris. Wash with warm soapy water then rinse and dry thoroughly.
The griddle surface should now be ready for seasoning.
Choosing the Right Oil
When choosing an oil, consider:
| Oil | Smoke Point | Notes |
| Refined Avocado | 520°F | Neutral flavor from refinement |
| Grapeseed | 420°F | Affordable, light taste |
| Refined Canola | 400°F | Highly versatile oil |
| Coconut | 350°F | Imparts strong flavor |
| Extra Virgin Olive | 375°F | Low smoke point, strong flavor |
Blackstone recommends: Refined avocado oil, grapeseed oil
High smoke point, neutral oils are ideal. Avoid unrefined olive oil, which burns easily.
The Seasoning Process
Now comes the fun part – properly seasoning your griddle. With the right techniques, you’ll have a gorgeously non-stick cooking surface in no time.
Detailed Step-by-Step Seasoning Guide
Follow these steps closely for ideal results:
- Clean the Griddle: Before seasoning, ensure the griddle is clean and free of any debris.
- Heat the Griddle: Turn on the griddle and let it heat up until it starts to brown.
- Apply Oil: Apply a thin layer of oil (canola oil, flax oil, vegetable oil, shortening, or olive oil) to the griddle surface.
- Let it Smoke: Allow the griddle to smoke for about 30 minutes until the smoke dissipates.
- Repeat: Repeat the oil application and heating process 2-3 times until the griddle plate turns dark brown.
- Final Touches: After 3-4 rounds of initial seasoning, let the griddle cool slightly and wipe it down with a final layer of Blackstone Griddle Seasoning & Cast Iron Conditioner or another suitable product to protect against oxidation.
- Maintenance: After each use, clean the griddle surface with water, apply a thin coat of seasoning oil or Crisco, and let it polymerize during preheating for the next cook.
Remember, proper seasoning creates a nonstick surface and protects the griddle from rust, enhancing its longevity and cooking performance.
Model-Specific Seasoning Instructions and Manufacturer Recommendations
Follow your user manual closely, as ideal seasoning procedures vary between Blackstone griddle models.
Key factors include:
- Burner output – Higher BTU griddles require more careful temperature control
- Cooking zones – Large griddles may need oils applied sequentially to different areas
- Surface coatings – Some models have additional porcelain or chrome surfaces requiring adjustment
While techniques remain largely the same, factoring in your Blackstone’s specific design ensures optimal, even seasoning.
Maintenance, Troubleshooting, and Advanced Care
Seasoning is not set-it-and-forget-it – your griddle requires ongoing care to stay in tip-top shape. Here are some tips for keeping things running smoothly.
Regular Maintenance and When to Re-Season
- Keep clean – avoid abrasive scouring, instead use warm soapy water and a grill brush.
- Touch up spots that look dry, discolored, or have visible pitting between full seasoning rounds.
- Re-season 1-2 times per year depending on frequency of use to maintain non-stick surface.
- Fix damage immediately – rust spots, chipping, etc. will spread if left unchecked.
Don’t wait for full breakdown to do touch ups. Quick maintenance prevents bigger headaches.
Safety Tips for Handling Hot Surfaces and Tools
Working with a scalding hot griddle has inherent dangers. Always:
- Use proper protective gloves, mitts, and clothing.
- Only re-season on a fully cooled griddle – temperature management is key.
- Avoid loose hair and clothing that could catch fire.
- Have a fire extinguisher on hand just in case.
- Never leave oil unattended – it can combust rapidly.
See more : How Many Pizzas For 30 People? – Get The Answer Now
With caution, you can safely manage the seasoning process. Don’t take risks.
Troubleshooting Common Issues
| Problem | Cause | Solution |
| Sticky surface | Under-seasoned | Scrub, re-oil, and re-season |
| Over-heated oil | Allow oil to fully smoke off – “season” don’t “burn” | |
| Rust spots | Moisture damage | Re-season problem areas thoroughly |
| Black/mottled | Over-seasoned | Strip season and start fresh |
| Uneven heating | Warping, damage | Gradually improve with seasoning rounds |
Don’t panic. Most issues can be resolved with a little seasoning TLC.
Seasoning in Different Climates: Adjusting Your Approach
Humidity, temperature, and other environmental factors impact seasoning success. Adjust accordingly:
- Low humidity helps seasoning polymerize faster. Spend less time distributing oil.
- High humidity slows curing. Allow oil coats to fully smoke off before adding more.
- Cool temperatures means less heat intensity. Slowly bring griddle up to higher seasoning temperatures.
- Windy conditions make managing heat and oil difficult. Block wind or season on calmer days.
Get to know your climate and the adjustments needed for ideal results.
Long-Term Griddle Care
- Store seasoned – wipe a thin coat of oil before putting away.
- Keep covered – use a protective lid or weather-proof tarp.
- Avoid harsh cleaners – use mild dish soap, warm water, and gentle scrubbing.
- Touch up damage – address scratches, rust, etc. with spot seasoning.
With careful storage and regular upkeep, your seasoned griddle will last for years.
Restoring the Seasoning Layer After Damage
Accidents happen. If your seasoning layer becomes damaged:
- Thoroughly clean damaged areas down to bare metal. Warm water and mild detergent work best.
- Dry completely before re-seasoning. Allow at least 24 hours if moisture has penetrated.
- Sand lightly if needed to smooth significant scratches in metal.
- Re-season following usual instructions, focusing on damaged areas. Do several rounds to build up protection.
- Be patient – it takes time to undo and rebuild damaged seasoning.
With a little elbow grease, you can often fully restore damaged areas. Prevent future issues through proper maintenance.
Maximizing Your Griddle’s Potential
Once seasoned, it’s time to start cooking. Pro tips will have your griddle performing optimally.
Cooking Post-Seasoning: Tips and Techniques
- Preheat slowly – quick extreme temp changes can damage seasoning.
- Use a touch of oil for cooking – a well-seasoned griddle only needs a little.
- Clean thoroughly after each use – leave oil behind and it can become sticky.
- Avoid aggressive scraping – soft scrapers protect the seasoning layer.
- Manage heat – uneven hot spots can degrade seasoning over time.
- Re-oil before storing – prevents rusting between uses.
With practice, you’ll master your seasoned griddle for incredible results.
Best Foods to Cook on a Seasoned Griddle
- Smashburgers – thinly pressed patties get deliciously crispy edges
- Vegetables – quick-cooking with charred bits but no sticking
- Seafood – the slick surface prevents delicate fish from breaking up
- Grilled cheese – golden brown bread with melted cheese perfection
- Quesadillas – browned tortillas and gooey melted filling
- Breakfast – pancakes, eggs, bacon, and more slide right off
The possibilities are endless with a well-seasoned griddle.
Enhancing Flavors and Cooking Experience Through Seasoning
- Browning – The slick surface encourages flavorful fond development
- Texture – Charring and crispiness not achievable on sticky pans
- Control – Regulating heat is easier on an evenly-conducting surface
- Ease – Food releases more cleanly, reducing frustration
- Trust – Knowing your seasoning is safe, pure, and healthy
Proper seasoning makes cooking on a griddle foolproof and flavorful.
Accessorizing Your Griddle
Take your griddle game further with accessories specially designed to enhance the cooking experience.
Recommended Accessories for Versatile Cooking
- Cutting board – food prep safely away from hot surface
- Spatulas and turners – sturdy yet gentle on seasoning layer
- Scraper – safely cleans without damaging seasoning
- Press – for perfectly thin smashburgers
- Lid – speed up heating while retaining heat and moisture
- Grease bucket – reduces risk compared to grease run-off
The right tools maximize versatility and safety.
Effective Use of Accessories for Different Meals
| Meal | Useful Accessories |
| Pancakes | Spatula, grease bucket |
| Grilled veggies | Spatula, lid |
| Smashburgers | Press, spatula, grease bucket |
| Seafood | Spatula with long handle to keep distance from splatter |
| Quesadillas | Spatula for flipping, lid for melting cheese |
Accessorize your griddle to unlock its full potential.
Conclusion
A properly seasoned griddle can transform outdoor cooking into an absolute pleasure rather than a hassle. While it takes patience and care, nothing beats gathering around a smokey griddle loaded with perfectly seared meat and veggies.
Hopefully this guide has equipped you with the knowledge needed to start strong with your Blackstone griddle. Remember seasoning is an ongoing journey – with experimentation and help from the community, you’ll be flipping flapjacks and smashing burgers like a pro.
Now get out there, heat up that griddle, and start making some mouthwatering memories. You’ve got the seasoning skills to make it an absolute success.

Executive Chef Sally Nesta has been cooking up a storm at Rocky’s Pub & Grill for over fifteen years. She is known for her delicious, hearty pub grub that will leave you munching for more. If you’re avoiding fat or gluten, no problem! Rocky’s Pub offers a number of low-fat and gluten-free choices. The bar at this restaurant is fully stocked, so pair your meal with a glass of wine or beer.Crowds tend to pack the place on weekends, so call ahead to reserve a table. Street parking is provided for those dining at the restaurant’s South Park Street location.Listen up, penny pinchers! Rocky’s Pub serves lip-smacking dishes that are full of flavor for next to nothing. So when you’re in the mood for some tasty pub food, make your way over to Rocky’s Pub.


